How to Create a Flask Application as a Python Package
This blog post explains how to create a Flask application as a Python package and why this is the recommended approach when writing a Flask app. More specifically, you’ll learn about the following topics:
- Installing required packages for your Flask project
- Creating a directory structure for your Flask project
- Dealing with Flask environment variables
- Creating your own Python project package for your Flask project
- Avoiding circular imports
- Creating a requirements.txt file for your Flask project
- Separation of concerns using multiple Python files in a single Flask project
- Running your Flask project inside a terminal or VSCode.

Before we’ll explain why it’s a good idea to create a Flask app as a package instead of a module, we’ll cover the differences between both. If you’re working with Python, you’re probably familiar with the difference between a script, module and a package. Although the terms “modules” and “packages” are used interchangeably, they are mean different things.
What is the difference between a Python module and a package?
According to this Udacity page, a module is an umbrella term for reusable code, that is imported either in interactive mode or into other programs. A package bundles together multiple modules. What bounds them together is a package name and an __init__.py file in the package folder. While a package is a module, not every module is a package.
Why use a package for a Flask app?
Now that we’ve got that explanation out of the way, let’s answer the following question: why is it a good idea to create a Flask app as a package?
The answer to this question is found in the Flask documentation: because it works better for large applications. For more background on this issue, check out this link on Stack Overflow. Now let’s move on to the next part of this blog post: how to structure a Flask application as a package.
How to structure a Flask application: an example
Following the information from the start of this blog post, we need a package name, an __init__py file and a file folder for a new Flask app. Let’s suppose you have created a basic “Hello World” app as described here. Let’s use that as the starting point for creating a Flask app as a package. This is a very basic Flask application, consisting of a single Python file that prints “Hello World” inside a browser.
Dealing with Flask environment variables
This is a good moment to discuss environment variables and how to deal with them. Environment variables are used by a Flask application to serve a project. If not set by the user, default settings are used. While older tutorials might mention setting these manually using “env=”, it’s now common practice to install and use the python-dotenv package, so you can store environment variables, passwords and API keys inside a single file that are hidden away from others. To install the package, run the following Python command inside a terminal:
pip install python-dotenvNow, create a file in the root folder named .flaskenv. Leave the file empty for now. When configuring the app.py file below, we’ll get back to using this package and .flaskenv file.
Creating a file folder structure for your Flask app and Python package
We’ll now create a new directory and two new empty files, __init__.py and views.py:
mkdir app
cd app
touch __init__.py views.py
The __init__.py file brings the application together and tells the Python interpreter that it is a package. Open the __init__.py file in VSCode and enter the following code:
from flask import Flask

app = Flask(__name__)

from app import views
The first line imports the Flask object from the flask package, the second line instantiates the app, while the third line imports the newly created views.py file. Doing this at the bottom of the file is OK, as explained under “Circular Imports” here at the bottom of the page.
Avoiding a circular import
However, if you use a code formatter in VSCode, it’s likely that the line “from app import views” is automatically placed to the top of the file upon save, which is understandable but problematic in this case. I say “understandable” as imports are normally placed on top of a Python file, but this is something we want to avoid here. Because if that happens, you have a created a circular import meaning your app won’t run.
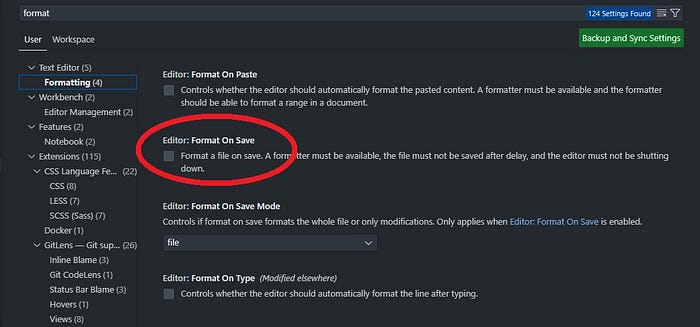
To disable automatic code formatting in VSCode, go to VS Code settings and in the search bar, type ‘format’. Next , under ‘Text Editor’, click ‘Formatting’ and untoggle ‘Editor: Format on Save’:
Separation of concerns: creating multiple Python files for a single project
By creating two additional Python files, we’re adding a separation of concerns to our application. For an app that only prints “Hello World”, this may look exaggerated, but the purpose here is to show how different imports are managed when creating a package. Open the views.py file and enter the following code:
from app import app


@app.route("/")
def index():
    return "Hello World"
Because of the __init__.py file in the same file folder, “from app” in views.py refers to a package. What’s imported is the app variable, as defined in the __init__.py file as app = Flask(__name__) and referred in the decorator function @app.route in views.py. What’s left is creating an entry point for the Flask app to run. The “Hello World” flask app uses a single Python file, app.py, which can be renamed as run.py in the root folder of the app. Next, delete the existing code and make sure it reads as follows:
from app import app
from dotenv import load_dotenv

load_dotenv()

if __name__ == "__main__":
  app.run()
The line “if __name__ == “__main”:” means that the contents of the file are only run if it is run as the main program. It won’t execute if it is imported as part of another program. Now, open the .flaskenv file and enter the following info:
FLASK_APP=run.py
FlASK_ENV=development
More info on .env and .flaskenv files and settings here. We’ll now cover how to create a requirements.txt file.
Creating a requirements.txt file
A requirements.txt file is needed when you want to deploy your app. It is basically a text file listing all dependencies for this particular project. You can generate it by running the following command in the terminal:
pip freeze > requirements.txtWith a single pip statement, you can install all packages and the correct versions listed in the requirements.txt folder, which is handy when deploying an application on a host as the contents of a virtual environment folder are not deployed to GitHub. Although deployment is not the purpose of this blog post, it’s good practice to create a requirements.txt file for your project. You can read more about creating and maintaining requirements files here.
You should now have the following directory and file stucture: notice the three different Python files in blue:

Running the project
You should be to run the app.py file without problems. Run the file directly from the terminal using “python run.py” or selecting “Run Python File” inside VSCode:

Conclusion
I admit this application is very simple since it only prints “Hello World” inside a browser, but the purpose of this blog post is to show how to structure a Flask app as a Python package. I hope this blog post has taught you some best practices to help you set up and structure your own Flask projects, such as:
- Installing required packages for your Flask project
- Creating a directory structure for your Flask project
- Dealing with Flask environment variables
- Creating your own Python project package for your Flask project
- Avoiding circular imports
- Creating a requirements.txt file for your Flask project
- Separation of concerns using multiple Python files inside a single Flask project
- Running your Flask project inside a terminal or VSCode.
In Plain English
Thank you for being a part of our community! Before you go:
- Be sure to clap and follow the writer! 👏
- You can find even more content at PlainEnglish.io 🚀
- Sign up for our free weekly newsletter. 🗞️
- Follow us on Twitter(X), LinkedIn, YouTube, and Discord.